Trello top tips and tricks: the complete guide
The ultimate list of Trello hacks, tips & tricks to help you use Trello like a pro!

Trello is loved by so many because it is pretty intuitive to use. However, once you have mastered the basics, it’s time to progress on to the more advanced and pro-level Trello tips and tricks, and techniques.
Below you will find an ever-growing collection of the best Trello tips, tricks and tutorials to help you master Trello, get more done, and impress your colleagues with your Trello wizardry!
1. Trello Keyboard Shortcuts
Let's get started with some good old keyboard shortcuts. This might not the sexy automation workflow you might have had in mind but if used correctly, keyboard shortcuts can save you just as much time as Butler (more on that in the "automations" section if you really can't wait).
If you prefer videos check out this from our YouTube Channel
Please update your cookie preferences below to view this content.
Below are some quick shortcuts you can use when viewing your cards at the board level (i.e. when you have not opened any cards yet and can see the whole board):
Insert a new card
- Hover your cursor over a card and press n
Copy a card
- Hover your cursor over a card and press Control + c
Paste a card
- Hover your cursor over a card and press Control + v
Open the filter function
- Press ‘f’
Clear all filters
- Press x
Count how many cards are in each list
- Press f to open the filter, then
- Press * in the search box
- A count of the number of cards will appear at the top of each list.
Add a label to a card
- Hover over a card and press L
- You can then press a number eg 1 or 2 or 3, etc. to add a label using your keyboard. Or click on one using your mouse.
Add a due date to a card
- Hover over a card and press d
Add a team member to a card
- Hover over a card and press m
Add yourself to a card
- Hover over a card and press the space bar
See only the cards you are a member of
- Press q
Archive a card
- Hover over a card and press c
Open card ‘quick edit mode'
- Hover over a card and press e
Quick edit the title of a card
- Hover over a card and press t
Open Menu
- press m
Move cards between lists without clicking and dragging
- When a card is open, use the “<“ or “>” arrows to move it between lists.
Now that you’re a speed demon with the keyboard, it's time for some more time-saving Trello tips and tricks.
2. Time-Saving Trello Tips and Tricks
How to easily create cards, from anywhere!
Trello is everywhere! Which is one of its greatest strengths as a task management tool. There are numerous add-ons, extensions, and apps for all your devices and browsers. We think it's worth using as many of these as you can to make life easier. By doing this you'll be able to create a card from wherever you are at the time.
Here are our three favourites that cover the most common situations:
- Google Chrome extension
- Once installed, you can quickly find a board by clicking the URL bar, pressing 't' and the Tab button, and then typing to search.
- Use the Trello icon in the extensions menu to quickly add a card to a board and optionally attach the current webpage you are viewing.
- Trello iPhone/Android app
- Open and manage your boards from your phone. Also, easily add webpages to Trello boards when viewing on your phone. Trello widgets are also available to give you a quick summary of tasks.
- Gmail Add-on
- Quickly add emails to Trello by opening up the Add-on and assigning it to a board/list. A new card will be created with the email contents as the description
- Trello Desktop app for Windows or Mac
- Great for managing Trello away from a browser. Our favourite tip is the ability to quickly create a new card using the keyboard shortcut 'Control' + 'option' + space bar.
Some more advanced options for automation between apps and Trello. We won't go into details here but worth investigating:
Adding links to cards
There are a few different ways to add links to Trello cards.
- Copy and paste using either the right-click function. Highlight a website URL (the text in the address bar) and right-click your mouse. Select “copy”. Then open a Trello card and right click and select “paste”. Or you can simply hover over the “create new card” section of a list and paste it - this will create a new card with that link.
- A more efficient option is to use the keyboard shortcut mentioned earlier. So highlight the link you want, press control + “c”, to copy. Then go to the card you want to paste into and pre and hold control + “v”.
- Another great way to add a link is to highlight the link and then simply drag and drop it to the card you want to add it to. Trello will automatically add it to the card. Or create a new card when dropped in the “create new card” section at the bottom of each list.
Navigate Trello with ease
Moving around Trello is pretty intuitive, but there are some tricks to make it even easier and faster.
- You can click and drag the board to move horizontally to see all your lists
- If using a mouse that supports finger dragging, you can do the same using your mouse pad or external mouse.
- Double-clicking on an empty space on your board will create a new list for you
- When a card is open, you can move it between lists by using the “<“ or “>” arrows. E.g. move it from “Doing” to “Done” without clicking and dragging it.
- And don’t forget to check out the keyboard shortcuts mentioned above. For example, you can open the menu (press “m”) or the filter (press “f”) with one keystroke.
3. Team Collaboration
Now that you are personally using Trello more effectively, it's time to increase collaboration with your team.
Adding team members
For starters, we need to add team members to your board. There are a few options for this to explain.
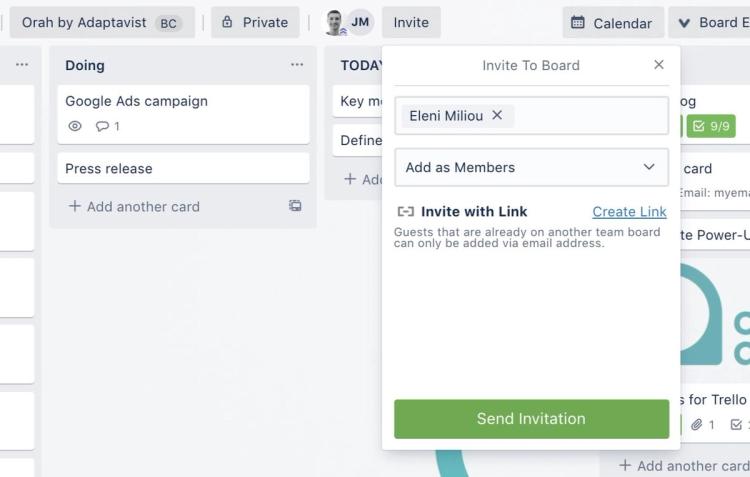
- Invite someone to the board using the “invite” button at the top of your board. Simply type the name of your team member and invite them to join your board.
- You can also select the type of access you want to grant them. The options are “Observer” or “Member”. Members have full access and can use the board as normal. Observers, on the other hand, can only view the board, open cards, and leave comments on cards.
2. Invite someone via a link. This is helpful if they do not already have a Trello account or if you need to paste a link somewhere, such as in a Slack conversation/channel.
Sharing Trello information externally - How to export board data
When working on a project in Trello, there may be times when you want to share information externally without requiring users to join or view a board directly in Trello.
To do this, you can export a board using the Power-up Board Export for Trello.
With this Power-Up, users can export board, card and list data to Excel, CSV, PDF, or jpeg formats. This allows for easy sharing with other parties, such as senior management, perhaps as part of a presentation deck or report.
Please update your cookie preferences below to view this content.
Assigning work to team members
We can ask our teammates to help us with work by adding them to a card.
The fastest way to do this is to hover over a card and press “m”. This will open the “members” view allowing you to select the teammate you want to assign to the card.
The other way to add them is by dragging and dropping their profile picture from the top bar to a card.
4. Automate Trello - How to use Butler
Trello is designed to be user-friendly and easy to set up. However, that doesn't mean it's 100% efficient and still contains quite a few manual processes.
There is an infinite amount of automation combinations available with Butler, but to give you a taste of what you can do, here is a simple example.
✏️ Note: Anyone can use Butler, but there are some restrictions on the number of automations you can run when on a free plan. For more automation potential, you'll need Trello Premium or Enterprise.]
Please update your cookie preferences below to view this content.
Automatically mark a card’s Due Date as ‘Completed’ when the card is moved to the “Done” list.
When you move a card to the "completed Tasks" column, the due date will still be showing as red until you open that card and ticked the "done" box to mark it as green.
This is where Butler automation can help.
Using Butler, we can easily and quickly set up an automation to run without needing to know how to write any code.
Here's how to set up an automation:
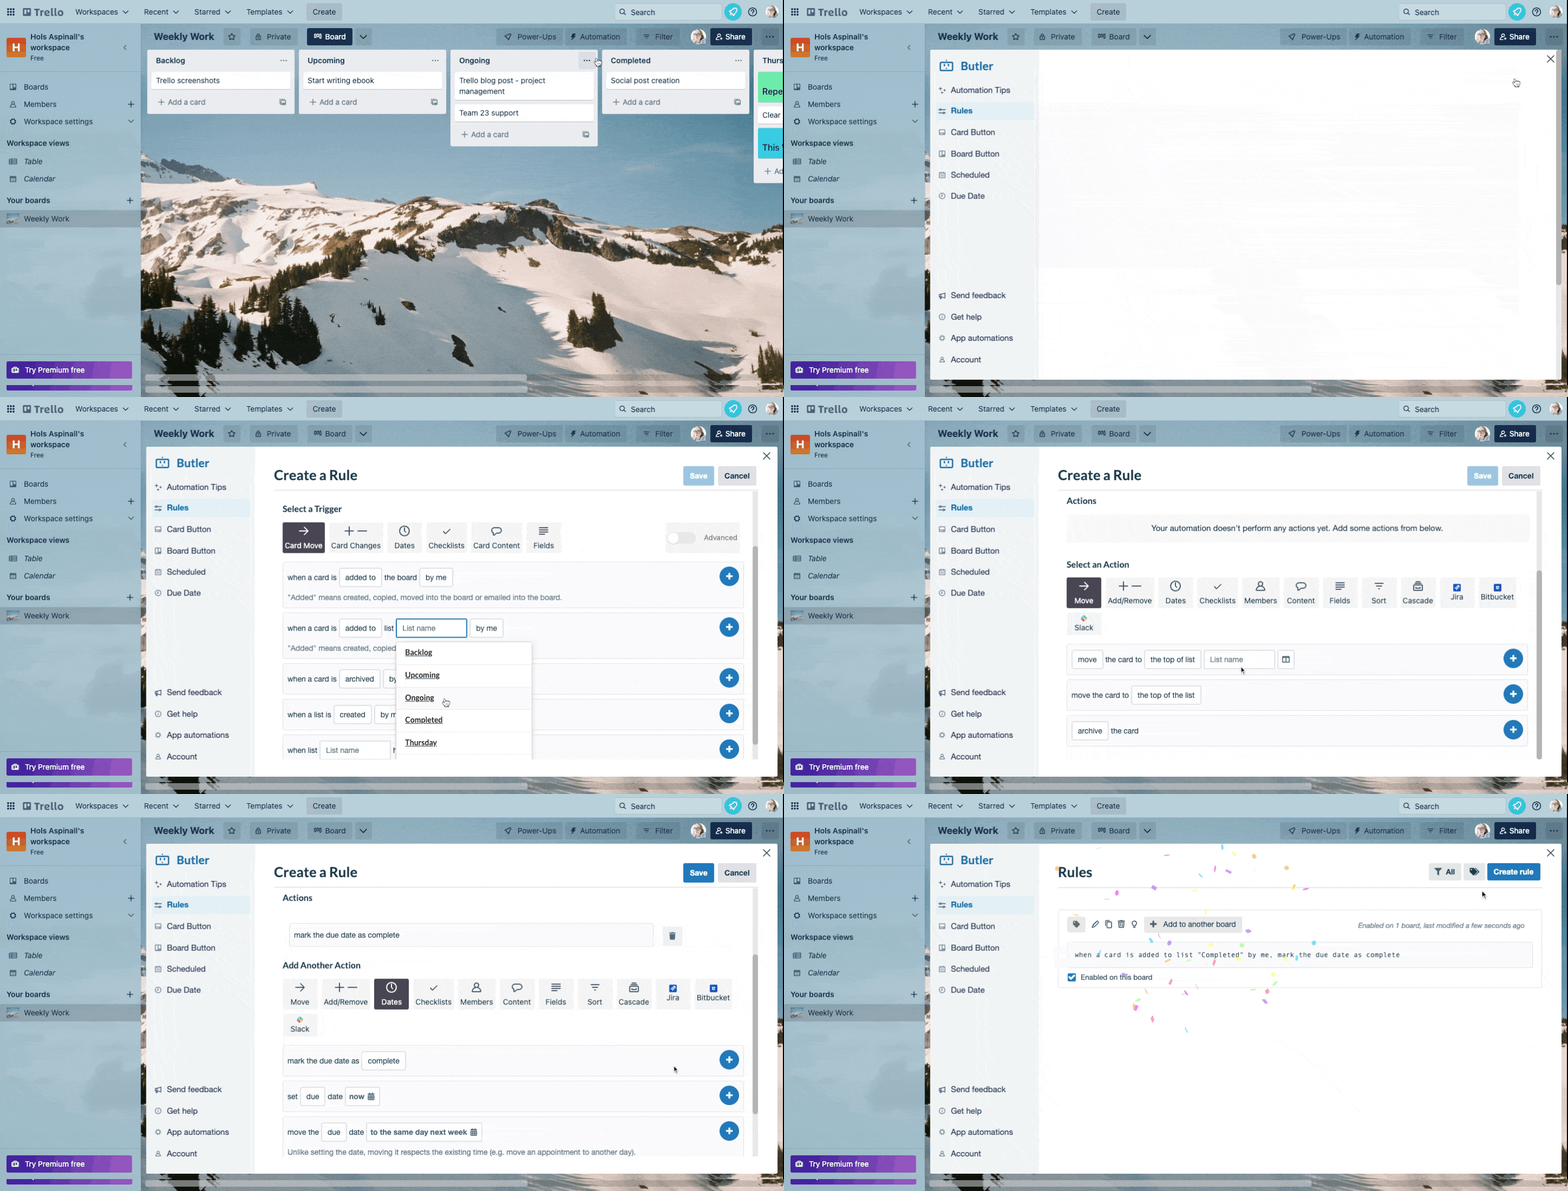
1. Navigate to Automation, then Rules.
2. Click the button 'Create rule' in the pop-up window.
3. Click 'Add trigger' and choose your trigger. For this rule, we chose to trigger the rule when a Card is added to the list 'Completed'.
4. Select an action. We chose to mark the due date on the card as complete.
✏️ Note: At this stage, it is also possible to add extra actions, such as:
- Removing team members from a card
- Adding a label
- Adding a comment
- And many more to improve your workflow.
Now that you have a taste for Butler, you can begin experimenting and finding your own automations!
5. Customise your Trello Board
Now for some fun! It's time to bring your board to life.
One of the reasons Trello is loved by so many users is it makes task management fun! Of course, it's very satisfying to move card into your Done column, but thats not all. Trello is a very visually engaging tool making it enjoyable to interact with and personalise.
Here are some fun ways you can customise and personalise your boards to match your teams style.
1. Change the board background.
Trello has partnered with Unsplash, a popular photography platform, so there's no excuse not to have a great picture to inspire you and the team each day. Or you can upload your own pictures if you are a Premium/Enterprise user.
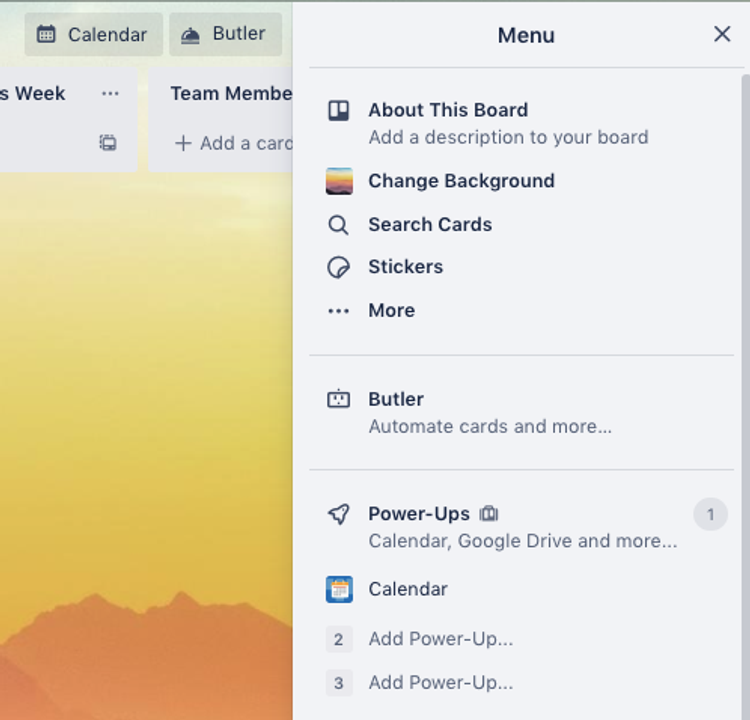
To do this just open up the menu and select "Change Background".
To do this just open up the menu and select "Change Background".
2. Add gifs
Trello loves gifs, there are quite a few places you can use these. You can even make your board background a gif but we'd suggest something quite slow moving or it might become a bit too much!
Gifs can be added to cards as stickers too. You need to be Premium/Enterprise user to do this.
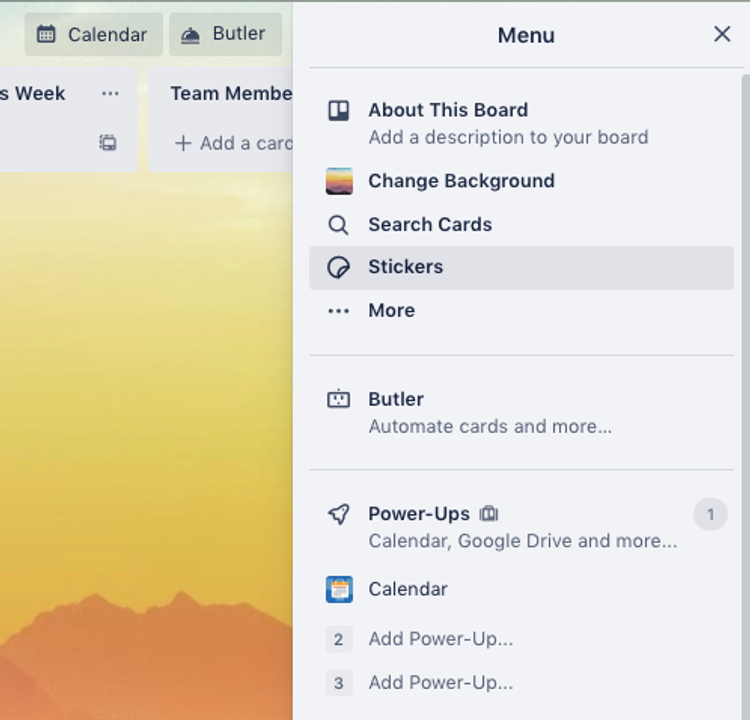
Navigate to "Show Menu" then "Stickers" then type in the search bar to find a gif.
👉 Tip: You can upload your own custom gifs if you want to get really creative. Navigate to "Show Menu" then "Stickers" scroll down to "Custom Stickers".
How to use Due Dates in Trello
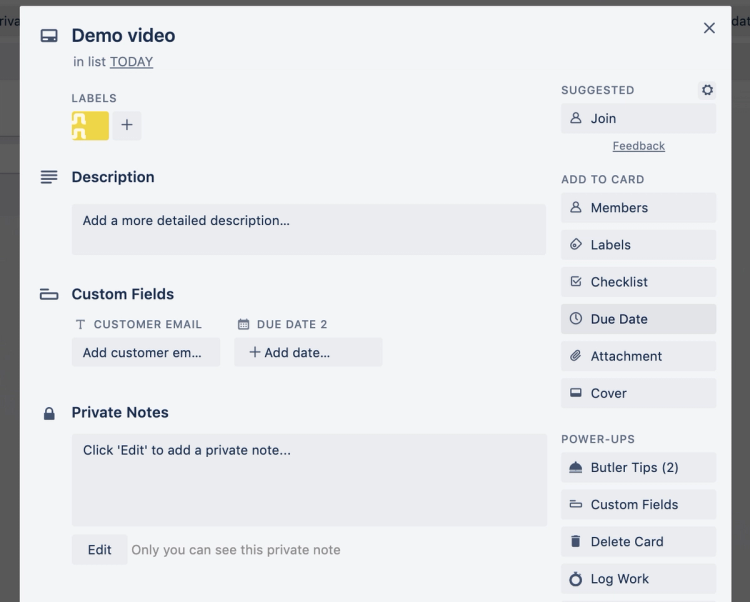
Due dates can be set in Trello using the built in due date option. Click Due Date on the right hand side menu.
How to set multiple due dates and reminders in Trello
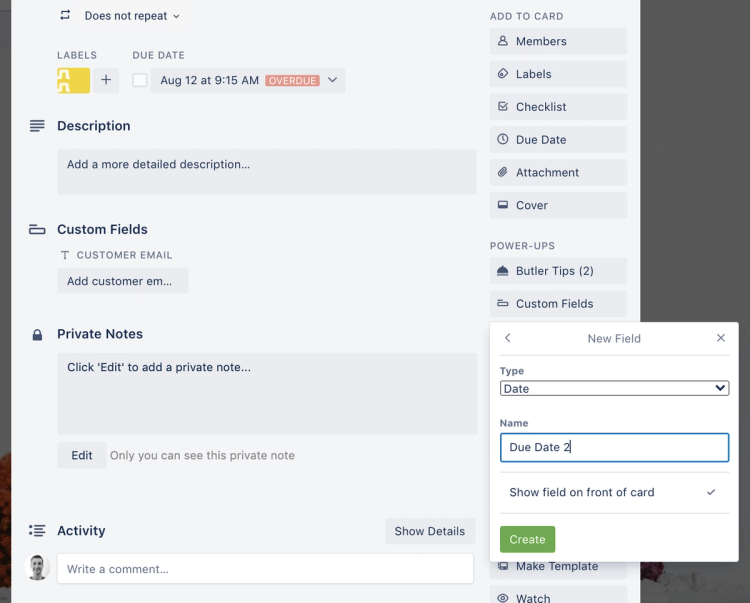
If you need more than one due date or reminder on a card you can use the free Custom Fields Power-Up to set a new custom field as a due date. This will allow for a second due date to be set on each card.
How to Delete Trello Boards and Cards
Get Card Delete for Trello - free!
Save time and effort deleting your Trello cards with our free Power-Up. No more archiving your cards! 🎉
