All about Confluence permissions: how to manage your users
Share on socials
All about Confluence permissions: how to manage your users

Jump to Section
Jump to section
What are Confluence permissions?
Why should you manage Confluence user permissions?
How to manage permissions in Confluence Cloud
- Global permissions
- Space permissions
- Page restrictions
How to bulk update page restrictions
Setting Confluence permissions: 4 best practices
Don’t let your Confluence get out of control! Learn how to set Confluence permissions at every level so you can keep information in the right hands.
Confluence is one of the best collaboration tools around. But when everyone has access to everything, misinformation and clutter can grow. Sometimes, it’s best to keep information within the hands of a few.
By taking control of Confluence permissions, you can say goodbye to chaos, grant access to users only where they need it, and keep sensitive data safe.
By taking control of Confluence permissions, you can say goodbye to chaos, grant access to users only where they need it, and keep sensitive data safe.
What are Confluence permissions?
Confluence user permissions allow you to control who can edit and access a Confluence site (and specific content inside it). Confluence has three levels of permissions: global permissions, space permissions, and page restrictions.
Global permissions
Global permissions apply to your entire Confluence account and affect all spaces and pages within it.
- Global permissions let you create and edit permissions for specific user groups in a Confluence account.
- Global settings are controlled by Confluence administrators, including user management and global settings.
Space permissions
Space permissions control who can access and edit content in specific Confluence spaces.
- Space permissions control a variety of specific actions that a user can take within a space. For example, you can decide whether users can add and delete content, export a space, and archive pages and whiteboards.
- Space administrators control permissions for assigned spaces. Space administrators can only manage permissions for spaces they have admin permissions for.
Page restrictions
Page restrictions let you choose who can view and edit specific pages within one Confluence space.
- Page restrictions can be set for specific users, groups, or both. You can grant or restrict viewing and editing permissions individually.
- Page restrictions override space permissions. Even if a user has permission to edit the entire space, they may still be restricted from editing certain pages within that space.
Why should you manage Confluence user permissions?
1. Control access to sensitive information: Confluence can contain sensitive information such as project plans, financial data, or confidential documents. Managing permissions lets you restrict access to only those who need it, helping to reduce unauthorised viewing.
2. Keep information relevant and up-to-date: Choosing not to restrict who can edit Confluence pages can lead to inaccurate content. If you have a single source of truth in Confluence, the integrity of your information is vital, and managing permissions can help maintain accuracy in your content.
3. Boost collaboration: At its heart, Confluence is a collaborative work tool, and it’s crucial to let employees use it as such (where it’s appropriate). Properly managing permissions lets teams share ideas and information in spaces that are relevant to them.
How to manage permissions in Confluence Cloud
There are several different ways to access Confluence admin controls depending on whether you’re managing it at a global, space, or page level. Let’s explore all three.
Please note: To manage global permissions, you’ll need to be a Confluence admin. To manage space permissions, you’ll need to be a Confluence admin or space admin (for that specific space).
Please note: To manage global permissions, you’ll need to be a Confluence admin. To manage space permissions, you’ll need to be a Confluence admin or space admin (for that specific space).
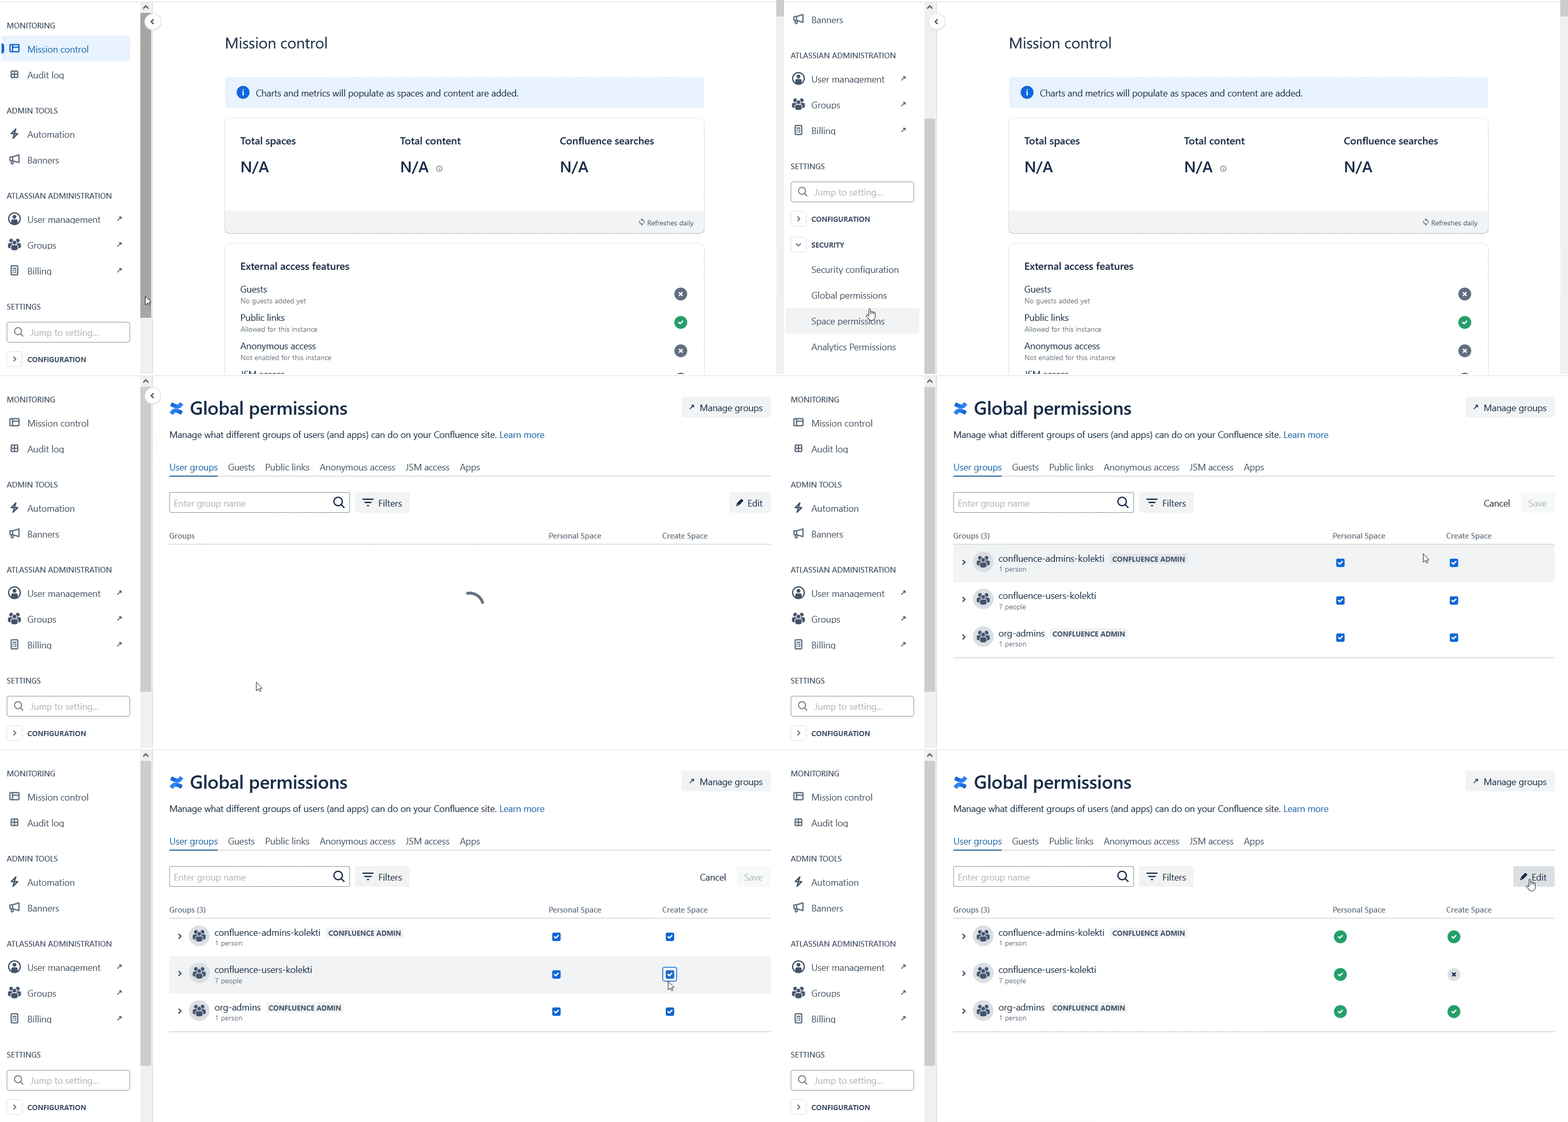
How to manage global permissions
1. Click on the cog icon in the top-right corner in Confluence.
2. In the left sidebar, scroll down to Security > Global permissions.
3. In the User groups tab, click Edit.
4. Either check the box to give permission to a user group, or uncheck it to remove permission.
5. Select Save.
See steps 2-5 in the gif below 👇

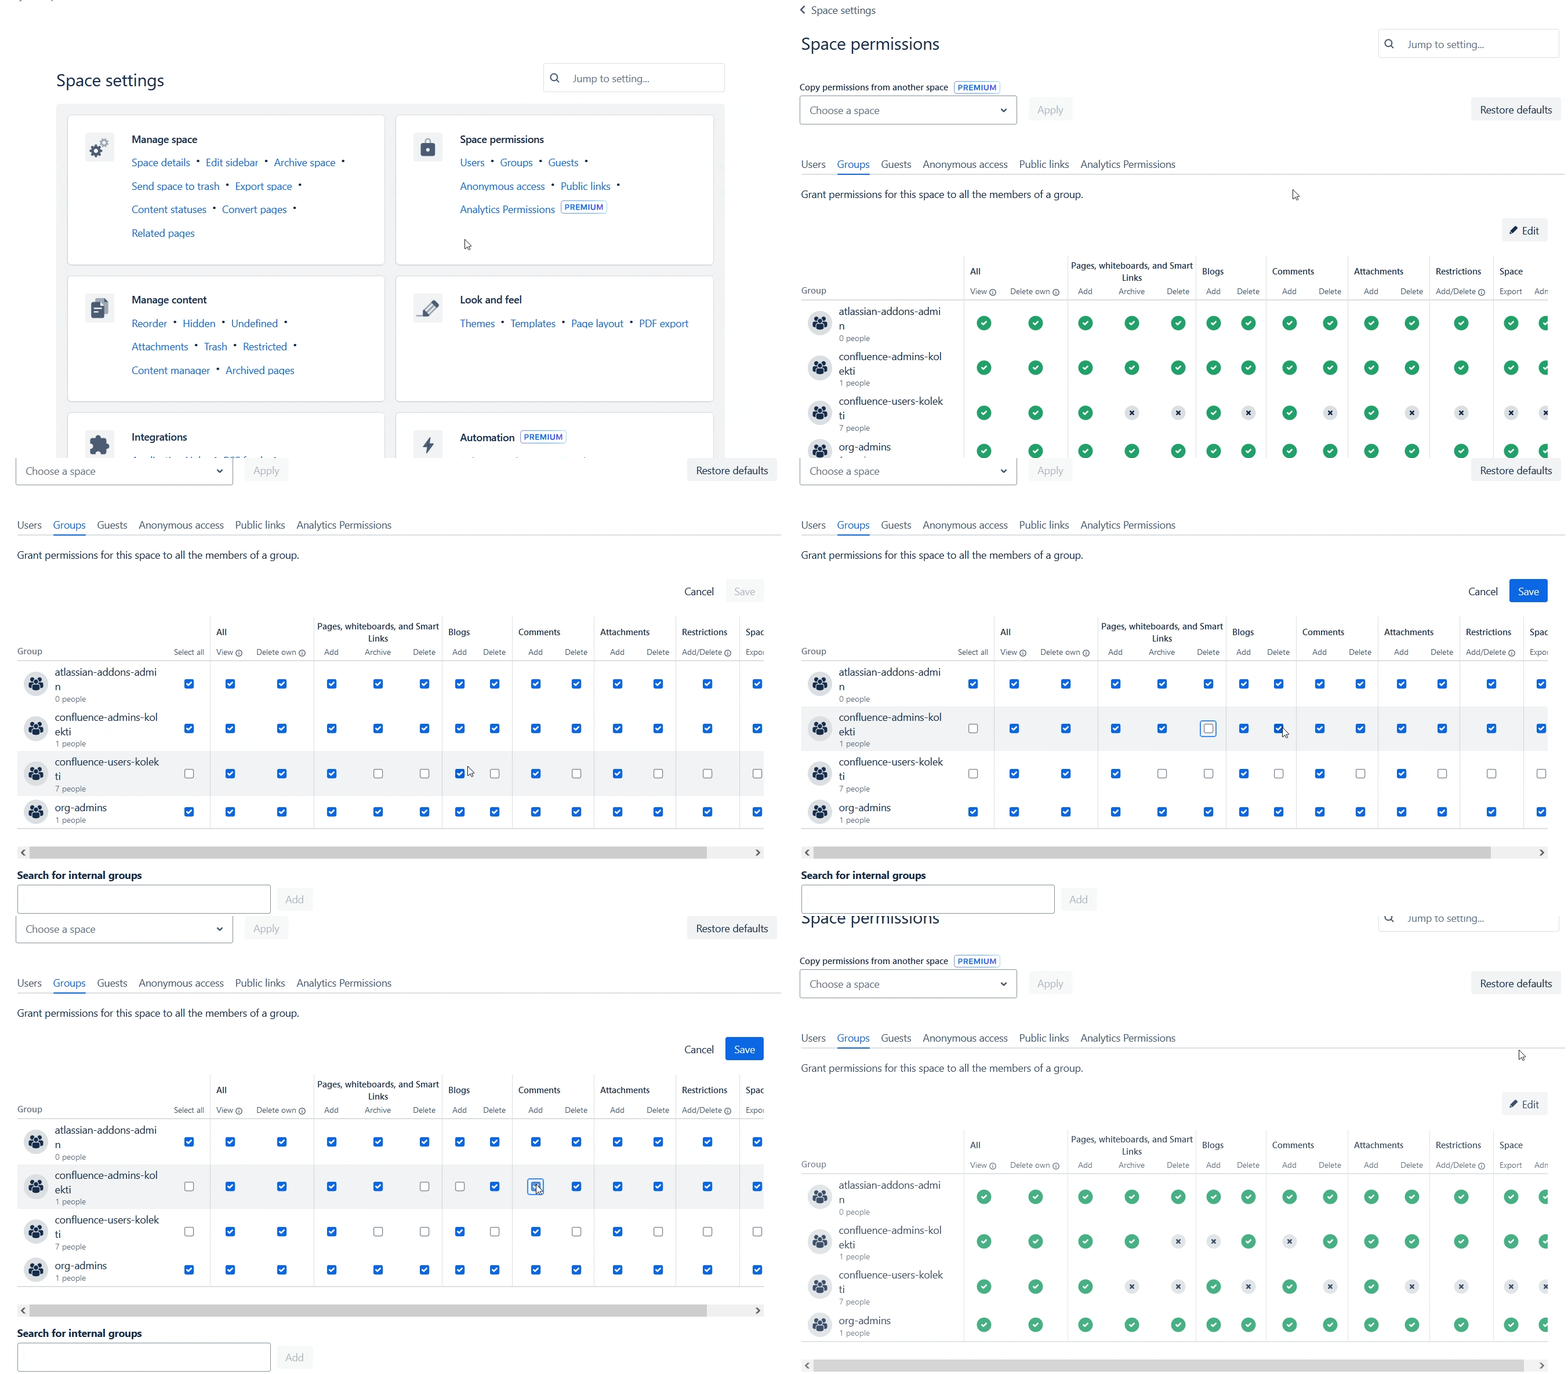
How to manage space permissions
1. Go to your chosen Confluence space, then click Space settings in the sidebar.
2. Under the Space permissions section, choose which permissions to change:
- Users: Add/remove people, or change a user’s permissions
- Groups: Add/remove groups, or change a group’s permissions
- Guests: Add/remove guests, or change guest permissions
- Anonymous access: Change whether anonymous users can access the space
3. Select Edit.
4. Check or uncheck specific boxes to allow or remove permissions for a specific user, group, or guest.
5. Click Save.
See steps 2-5 in the gif below 👇

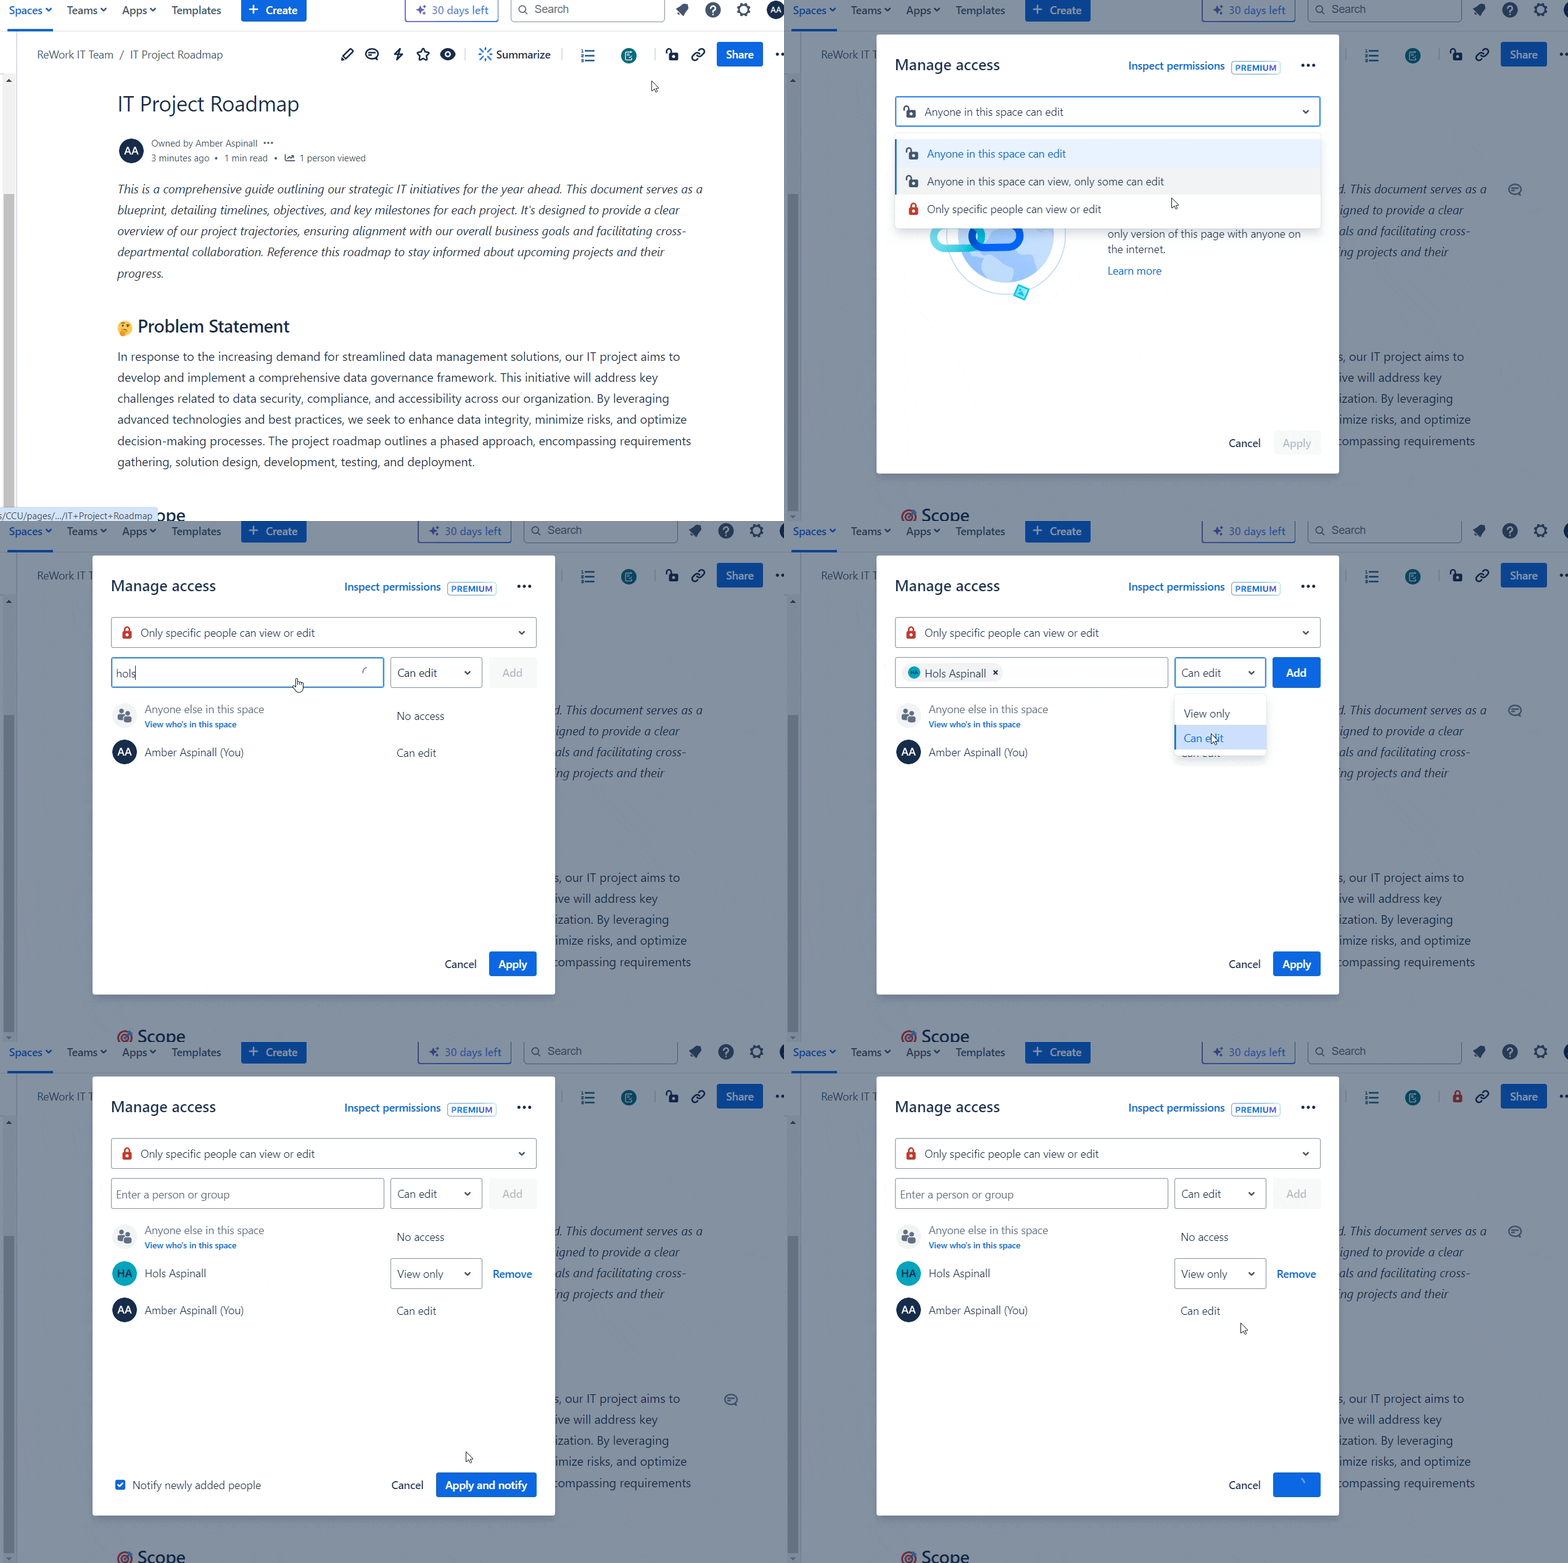
How to manage page restrictions
1. Go to your chosen Confluence page and select the padlock icon in the top-right corner.
2. In the pop-up dialog, click the dropdown menu to change page permissions. You can choose from three permission levels:
- Anyone in the space can edit
- Anyone in the space can view, only some can edit: You can assign specific users to edit the page, but anyone can view it
- Only specific people can view or edit: You have total control over who views or makes changes to the page
3. If you’ve chosen to restrict who can edit/view the page, type in the names of users to give permissions to, and choose whether they can view or edit the page. Click Add and repeat for each user.
4. Confluence automatically notifies the specific people you’ve given access to your page - to turn this off, uncheck the box in the bottom-left.
5. Click Apply and notify (or Apply if you’ve turned notifications off).
Follow the steps in the gif below 👇

How to bulk update page restrictions in Confluence
To change multiple page restrictions at once, you'll need the help of an app called Panorama for Confluence. Learn more with our guided tutorial:
- Install Panorama for Confluence.
- Click Apps, then Panorama for Confluence.
- From the Panorama control centre, add your spaces.
- Select all the content you want to change the restrictions on.
- Click Restrictions.
- Select to change all restrictions for users, or assign permission levels to specific users.
- Click Apply to confirm.
Setting Confluence permissions: 4 best practices
Properly configured user permissions are crucial for maintaining security and organisation within Confluence. Here are some tips to help you get it right:
1. Organise your users: Group users logically based on their roles and responsibilities. This makes it easier to manage permissions, and helps give everyone the appropriate level of access.
2. Get the right balance: Give users the permissions they need to do their jobs, but don’t go overboard. If a user is a member of the IT team, they might not need edit access in the accounts Confluence space. Letting users get on with the job - without giving them complete control over every area of Confluence - reduces the risk of information loss.
3. Document everything: Document your user, group, and guest permissions for easy reference. This not only helps you keep track of who has access to what, but it also helps you identify that you're meeting any important regulatory requirements.
4. Review permissions regularly: Set aside time to review and update permissions on a regular basis. Frequent monitoring helps you spot whether you have outdated or unnecessary permissions, meaning you can act quickly to keep information in the right hands.
Manage Confluence spaces with ease
Panorama for Confluence lets you bulk edit, move, delete, and change restrictions with ease. Try it free for 30 days:
Related Content
Read moreWritten by

Senior Content Marketing Manager
With a 20-year career in content marketing, Simon has represented a range of international brands. His current specialism is the future of work and work management. Simon is skilled at launching content pipelines, establishing powerful brands, and crafting innovative content strategies.
Related Content
Read more


